瑞萨开发版编译和烧录
烧板子是一条充满荆棘的路,尤其是对于之前没有烧过的同学来说,更对于比较冷门的板子来说。去某高校的实验室跑了两趟,和官方技术支持挤牙膏挤了好久才挖点资料过来参考。换了两台电脑,在PC上交叉编译,最后终于烧…好了…一把辛酸泪…
1. yocto编译开发版所需的文件
参考
下载文件10G左右,整个编译的目录所需空间为100G左右,需保证硬盘的剩余空间至少150G
主要注意的是需加入local.conf里添加caffe和opencl支持
最后编译后的文件在$WORK/build/temp/deploy/images/salvator-x目录,文件列表如下:
bl2-salvator-x.bin
bl2-salvator-x.elf
bl2-salvator-x.srec
bl31-salvator-x.bin
bl31-salvator-x.elf
bl31-salvator-x.srec
bootparam_sa0.bin
bootparam_sa0.srec
cert_header_sa6.bin
cert_header_sa6.srec
core-image-weston-salvator-x.ext4
core-image-weston-salvator-x.manifest
core-image-weston-salvator-x.tar.bz2
core-image-weston-salvator-x.tar.gz
core-image-weston-salvator-x.testdata.json
core-image-weston-salvator-x-20181206022553.rootfs.ext4
core-image-weston-salvator-x-20181206022553.rootfs.manifest
core-image-weston-salvator-x-20181206022553.rootfs.tar.bz2
core-image-weston-salvator-x-20181206022553.rootfs.tar.gz
core-image-weston-salvator-x-20181206022553.testdata.json
core-image-weston-sdk-salvator-x.ext4
core-image-weston-sdk-salvator-x.manifest
core-image-weston-sdk-salvator-x.tar.bz2
core-image-weston-sdk-salvator-x.tar.gz
core-image-weston-sdk-salvator-x.testdata.json
core-image-weston-sdk-salvator-x-20181206052426.rootfs.ext4
core-image-weston-sdk-salvator-x-20181206052426.rootfs.manifest
core-image-weston-sdk-salvator-x-20181206052426.rootfs.tar.bz2
core-image-weston-sdk-salvator-x-20181206052426.rootfs.tar.gz
core-image-weston-sdk-salvator-x-20181206052426.testdata.json
Image
Image–4.14.35+git0+118adc53e8-r1-r8a7795-es1-salvator-x-20181206022553.dtb
Image–4.14.35+git0+118adc53e8-r1-r8a7795-es1-salvator-x-view-20181206022553.dtb
Image–4.14.35+git0+118adc53e8-r1-r8a7795-salvator-x-20181206022553.dtb
Image–4.14.35+git0+118adc53e8-r1-r8a7795-salvator-xs-2x2g-20181206022553.dtb
Image–4.14.35+git0+118adc53e8-r1-r8a7795-salvator-xs-4x2g-20181206022553.dtb
Image–4.14.35+git0+118adc53e8-r1-r8a7795-salvator-xs-20181206022553.dtb
Image–4.14.35+git0+118adc53e8-r1-r8a7795-salvator-x-view-20181206022553.dtb
Image–4.14.35+git0+118adc53e8-r1-r8a7796-salvator-x-view-20181206022553.dtb
Image–4.14.35+git0+118adc53e8-r1-salvator-x-20181206022553.bin
Image-r8a7795-es1-salvator-x.dtb
Image-r8a7795-es1-salvator-x-view.dtb
Image-r8a7795-salvator-x.dtb
Image-r8a7795-salvator-xs.dtb
Image-r8a7795-salvator-xs-2x2g.dtb
Image-r8a7795-salvator-xs-4x2g.dtb
Image-r8a7795-salvator-x-view.dtb
Image-r8a7796-salvator-x-view.dtb
Image-salvator-x.bin
modules–4.14.35+git0+118adc53e8-r1-salvator-x-20181206022553.tgz
modules-salvator-x.tgz
r8a7795-es1-salvator-x.dtb
r8a7795-es1-salvator-x-view.dtb
r8a7795-salvator-x.dtb
r8a7795-salvator-xs.dtb
r8a7795-salvator-xs-2x2g.dtb
r8a7795-salvator-xs-4x2g.dtb
r8a7795-salvator-x-view.dtb
r8a7796-salvator-x-view.dtb
tee-salvator-x.bin
tee-salvator-x.elf
tee-salvator-x.srec
u-boot.bin
u-boot-elf.srec
u-boot-elf-salvator-x.srec
u-boot-elf-salvator-x-v2015.04+gitAUTOINC+6a82c94590-r0.srec
u-boot-salvator-x.bin
u-boot-salvator-x-v2015.04+gitAUTOINC+6a82c94590-r0.bin
2. 将文件烧录进开发板
串口线连接,开发板的CN25口连接pc的usb口
网线连接,用附带的蓝色网线(交叉网线)连接开发板网线接口和pc网线接口
2.1 烧录mini monitor
注意sw设置
参考HyperFlash_miniMonitor_update_procedure_rev1.00.txt和
SPIflash_miniMonitor_update_procedure_rev1.00.txt
2.2 烧录u-boot
环境配置
pc端用teraterm烧录u-boot,需要在Windows环境下。
- Windows host PC
- terminal dirver 终端软件
TeraTerm
下载地址: - VCP driver
windows下安装驱动,使USB口变成虚拟串口,并能被终端检测到。
驱动下载地址:
也能找瑞萨要软件的文件
Board setting
- Power off the board, change the DIP switch to Hyper Flash Mode:


IPL/U-BOOT FLASHING
-
Open Tera Term(teraterm-4.97ttermpro.exe) and configure serial port:

-
Power on the board and check the boot information:
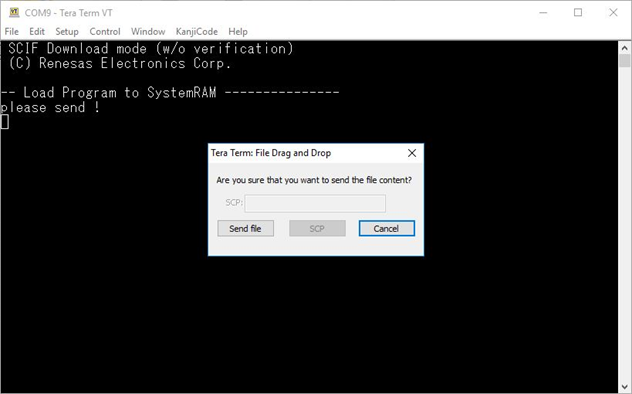

-
Use Macro in Tera Term to automatically flashing IPL/U-Boot and select loader-writer-with-salvator_390.ttl in the salvator-x folder:

- set DIP sw7 to 1 pin
否则会遇到以下报错
- Reset or Power Off/On the board.
2.3 烧录内核
2.3.1 环境配置
需要Linux Host PC
使用tftp将内核文件烧录进开发板的内存
-
- 安装tftp-hpa和tftpd-hpa
-
- 设置tftp根目录及设置访问属性
建立一个tftp的根目录,用于存放用tftp传输的文件,
包括Image和dtb文件,对salvator-xs开发板,指的是Image和 *salvator-xs.dtb
然后设置对应的访问属性
其中:
(1)tftp是我的TFTP的根目录,根据情况修改为自己的根目录。
(2)chmod是去更改tftpboot这个TFTP根目录的访问属性,因为其他tftp用户需要使用put命令上传文件的话,那就需要write权限的,所以这里干脆省事,直接chmod 777,添加所有权限(读+写+执行)。 - 设置tftp根目录及设置访问属性
-
- 更改配置文件/etc/default/tftpd-hpa
-
- 重启tftp 服务
-
- 验证tftp是否生效
2.3.2 开发板和Linux Host PC 之间Ping通
用picocom连接接开发板和PC
出现如下界面
接着打开电源,power on,出现一下界面
表示进入u-boot
-
设置mac地址
mac地址可设置为开发板上网线接口处的贴纸上的mac地址
在u-boot设置为
-
设置ip
pc设置ethernet的ip
[外链图片转存失败,源站可能有防盗链机制,建议将图片保存下来直接上传(img-myQrcO0H-1578653909015)(https://note.youdao.com/yws/res/204/WEBRESOURCEcf0653fae8ac6ba36614c9cf5e35e059)]在u-boot设置pc的ip,和pc上设置的ethernet的ip保持一致
在u-boot设置开发板的ip
-
保存设置的变量
-
ping PC的ip,保证网络连通
在u-boot中输入以下命令出现以下界面表示ping通
2.3.3 将内核文件烧录进开发板
将Image 和 Image-r8a7795-salvator-xs.dtb 放进tftp根目录
WORK为yocto编译文件存放的目录
查看tftp根目录的文件
烧录内核文件
2.4 挂载文件系统
用nfs
-
环境配置
-
创建nfs跟目录和文件系统复制进nfs目录下
或者
-
Edit /etc/exports:
add
/nfs/salvator-x *(rw,no_subtree_check,sync,no_root_squash,no_all_squash)Save the file and exit.
-
Force NFS server to re-read /etc/exports
-
Verify that NFS is working.
Export list for localhost:
-
在开发板的u-boot中设置nfs
其中192.168.1.76为linux host pc 的ip,/nfs/salvator-x 为pc上ethernet的ip, 192.168.1.3为开发板的ip
2.5 启动板子
启动成功后
登录名为root,没有密码,登录后进入开发板的linux命令行界面
salvator-x login: rootroot@salvator-x:~#
来源:阔岩
                                                        声明:本站部分文章及图片转载于互联网,内容版权归原作者所有,如本站任何资料有侵权请您尽早请联系jinwei@zod.com.cn进行处理,非常感谢!