本博客同时发布于个人主页:www.doctorsrn.cn
本博客续:V-rep机器人仿真软件使用的学习笔记-续
相关博客:V-rep中机械臂惯性参数的获取方法
前言
这篇博客主要是记录自己学习和使用机器人仿真软件V-rep过程中的一些知识点和踩的坑。首先从下面两个问题展开:
- 常用的机器人仿真软件有哪些什么选择V-repbr> 目前常用的机器人物理仿真软件有Gazebo、V-rep、Webots等,这三款都是开源软件,自己使用过前两种,Gazebo配合ROS使用功能十分强大,但是要在Linux系统下使用,会有些不方便;V-rep是一个跨平台的仿真软件,在windows和Linux下都可以很稳定的运行,而且软件体积较小。考虑到要在windows下使用仿真软件,以及V-rep方便的Python API接口和易用性,最终选择使用V-rep。
- V-rep在自己项目的应用情况br> 自己使用V-rep主要用来进行机械臂规划和控制方面算法的验证和仿真实验,主要用于以下两个方面:
- 利用V-rep的物理仿真环境,建立类似OpenAI Gym的交互环境,进行基于强化学习的机械臂规划和控制方法方面的仿真实验。
- 利用V-rep进行双臂机器人协作规划和控制算法研究
V-rep中内置了很多商用机械臂模型。如果使用Gazebo,可以搭配ROS Moveit!进行机械臂相关的仿真和实物规划与控制。
PS: 本文内容对应的V-rep的版本:V-rep 3.6.1 rev3, 学习过程有问题可以去V-rep的社区提问,感觉管理者的反馈很快而且很负责任,自己在使用过程去社区报了遇到的BUG,管理员还给自己发邮件确认姓名,说要在新版本的更新log中将自己加入贡献人中,然后在新版本的log中就发现了自己的姓名,还是很开心的~


2.2.1 non-threaded child scripts
non-threaded child scripts包含一组阻塞函数,即每次被调用时将执行一些任务,然后返回控制权,如果没有返回则整个仿真一直停滞。每个仿真间隔中non-threaded child scripts将被main script调用两次:main script’s actuation and sensing 。
Tip:优先选择non-threaded child scripts来写子脚本。
non-threaded child scripts应当被分为4个函数来写:
- 初始化函数sysCall_init:仅在child script被调用时执行一次
- 执行函数sysCall_actuation:每个仿真循环都被调用
- 传感器函数sysCall_sensing:每个仿真循环都被调用
- 恢复函数sysCall_cleanup:仅在仿真结束被调用一次
2.2.2 threaded child scripts
threaded child scripts将会启用一个线程,线程的启用和恢复由主脚本的sim.launchThreadedChildScripts和sim.resumeThreads函数控制。当线程子脚本正在执行时,不会二次启动它。
Tips:threaded child scripts存在耗时的问题
threaded child scripts包括两个函数部分:
- 线程主部分函数sysCall_threadmain
- 恢复函数sysCall_cleanup
可以通过以下三个函数控制threaded child scripts的执行: sim.setThreadSwitchTiming、sim.setThreadAutomaticSwitch、sim.switchThread
2.3 Script simulation parameters
脚本仿真参数,在脚本中可以通过以下函数读取和设置仿真参数:
- sim.getScriptSimulationParameter
- sim.setScriptSimulationParameter
2.4 Customization scripts
自定义脚本主要用于对仿真场景的拓展,比如控制仿真地面的大小:

6.Vrep中路径规划的两种情况
具体程序参考Vrep的Python程序例程:
- 目标点由笛卡尔空间的位姿点给出,此时的思路是:
位姿点–>逆解算得到配置空间对应的多个关节坐标(满足一定的精度即可,space metric作为判定条件。然后根据起始点和目标点坐标的配置空间距离进行排序),并验证关节坐标的无碰撞和可行性–>在配置空间进行路径规划 - 目标点由配置空间的关节坐标直接给出,此时的思路是:
在配置空间直接进行路径规划
路径规划要考虑的四要素:
- 机械臂运动学
- 关节限位
- 机械臂防自碰撞
- 机械臂与障碍物间的防碰撞
Tips:
- 早期Vrep内建路径规划功能(不建议使用)
7.关于Vrep自带模型的D-H参数获取的办法
- 使用vrep在tool目录下提供的D-H参数提取工具进行获取
- 根据机械臂的名称去官网下载其CAD模型,利用CAD软件进行获取
8.远程API工作方式分析(官方文档)
API函数操作模式:
- simx_opmode_oneshot
- simx_opmode_oneshot_wait
- simx_opmode_streaming
- simx_opmode_oneshot_split
- simx_opmode_discontinue
- simx_opmode_buffer
- simx_opmode_remove
- 阻塞式和非阻塞式
一个重要例子:通过远程API控制多个关节同时转动,可以通过先暂停通信线程,发送完指令后再恢复通信线程实现。暂停通信线程时,远程客户端不会与远程服务器之间进行通信。示例代码:
-
数据流的形式
实现的效果是定时从某个句柄中获取需要的数据,通过和实现,示例代码: -
同步操作
。。。
9.Vrep中关节不同的属性
参考文档:Entities–>Scene objects–>Joint–>Joint types and operation
不同的关节属性对应不同要的仿真要求,比如位置控制、动力学仿真、关节力矩控制等。
根据关节的属性使用不同函数设置关节的位置、速度:
- simSetJointPosition() (when your joint is not in force/torque mode 比如说inverse kinema模式)
- simSetJointTargetPosition() (when your joint is in force/torque mode, its motor enabled and its control loop also enabled)
- simSetJointTargetVelocity (when your joint is in force/torque mode, its motor enabled, and its control loop NOT enabled)
10.Vrep中仿真过程不同状态的介绍
仿真状态分为:停止、开始、暂停三个状态。在仿真内部还有一些内部状态用来表示下一时刻的状态,使程序更好地控制仿真过程,状态切换图如下:

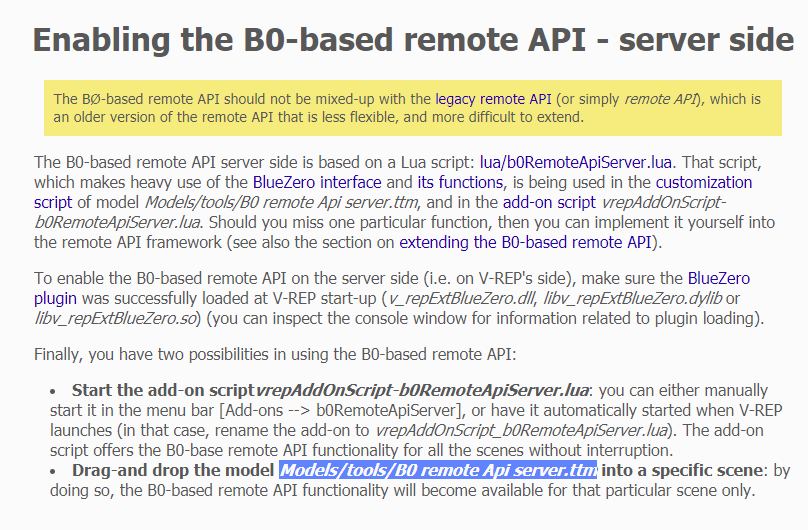
默认情况下,B0-based remote API的Client和Server之间是异步工作的。可以通过设置使Client单独触发每个仿真时间片,达到同步工作模式。以下是Python形式Client端同步工作模式的示例代码:
在Server端添加b0RemoteApiServer,参考官方文档:Writing code in and around V-REP–>V-REP API framework–>Remote API–>B?-based remote API–>Enabling the B0-based remote API – server side
直接通过File–>Load Model将添加至当前场景即可。
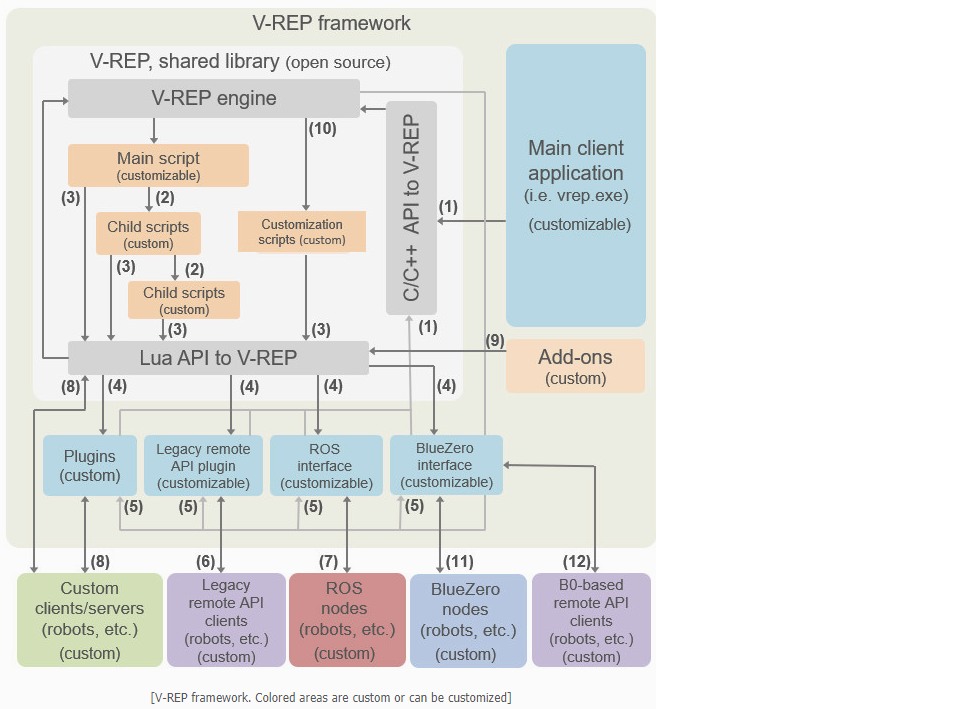
1.1 vrep 工作模式下API之间的关系:
- Client端:使用B0-based remote API:,实现方式是直接将server端b0 API中的函数名进行再次封装,然后发送至server端。
- Server端:使用server端b0 API,API文件为,server端b0 API文件b0RemoteApiServer.lua内部实现主要是将regular API进行封装。
2. vrep中吸盘工具suction pad的使用
参考以下资料:
- 场景中有吸盘工具的使用
- 模型中有吸盘工具的使用
- http://www.forum.coppeliarobotics.com/viewtopic.php=9&t=5317&p=21341&hilit=vrep+suction+pad#p21341
添加吸盘工具至机械臂末端,根据吸盘的子程序:
function sysCall_init()     s=sim.getObjectHandle('suctionPadSensor')    l=sim.getObjectHandle('suctionPadLoopClosureDummy1')    l2=sim.getObjectHandle('suctionPadLoopClosureDummy2')    b=sim.getObjectHandle('suctionPad')    suctionPadLink=sim.getObjectHandle('suctionPadLink')    infiniteStrength=sim.getScriptSimulationParameter(sim.handle_self,'infiniteStrength')    maxPullForce=sim.getScriptSimulationParameter(sim.handle_self,'maxPullForce')    maxShearForce=sim.getScriptSimulationParameter(sim.handle_self,'maxShearForce')    maxPeelTorque=sim.getScriptSimulationParameter(sim.handle_self,'maxPeelTorque')    sim.setLinkDummy(l,-1)    sim.setObjectParent(l,b,true)    m=sim.getObjectMatrix(l2,-1)    sim.setObjectMatrix(l,-1,m)endfunction sysCall_cleanup()     sim.setLinkDummy(l,-1)    sim.setObjectParent(l,b,true)    m=sim.getObjectMatrix(l2,-1)    sim.setObjectMatrix(l,-1,m)end function sysCall_sensing()     parent=sim.getObjectParent(l)    if (sim.getScriptSimulationParameter(sim.handle_self,'active')==false) thenif (parent~=b) then    sim.setLinkDummy(l,-1)    sim.setObjectParent(l,b,true)    m=sim.getObjectMatrix(l2,-1)    sim.setObjectMatrix(l,-1,m)end    elseif (parent==b) then    -- Here we want to detect a respondable shape, and then connect to it with a force sensor (via a loop closure dummy dummy link)    -- However most respondable shapes are set to "non-detectable", so "sim.readProximitySensor" or similar will not work.    -- But "sim.checkProximitySensor" or similar will work (they don't check the "detectable" flags), but we have to go through all shape objects!    index=0    while true do shape=sim.getObjects(index,sim.object_shape_type) if (shape==-1) thenbreak end if (shape~=b) and (sim.getObjectInt32Parameter(shape,sim.shapeintparam_respondable)~=0) and (sim.checkProximitySensor(s,shape)==1) then-- Ok, we found a respondable shape that was detected-- We connect to that shape:-- Make sure the two dummies are initially coincident:sim.setObjectParent(l,b,true)m=sim.getObjectMatrix(l2,-1)sim.setObjectMatrix(l,-1,m)-- Do the connection:sim.setObjectParent(l,shape,true)sim.setLinkDummy(l,l2)break end index=index+1    endelse    -- Here we have an object attached    if (infiniteStrength==false) then -- We might have to conditionally beak it apart! result,force,torque=sim.readForceSensor(suctionPadLink) -- Here we read the median value out of 5 values (check the force sensor prop. dialog) if (result>0) thenbreakIt=falseif (force[3]>maxPullForce) then breakIt=true endsf=math.sqrt(force[1]*force[1]+force[2]*force[2])if (sf>maxShearForce) then breakIt=true endif (torque[1]>maxPeelTorque) t
来源:DoctorSRn
                                                        声明:本站部分文章及图片转载于互联网,内容版权归原作者所有,如本站任何资料有侵权请您尽早请联系jinwei@zod.com.cn进行处理,非常感谢!