 View demo 查看演示 Download Source 下载源
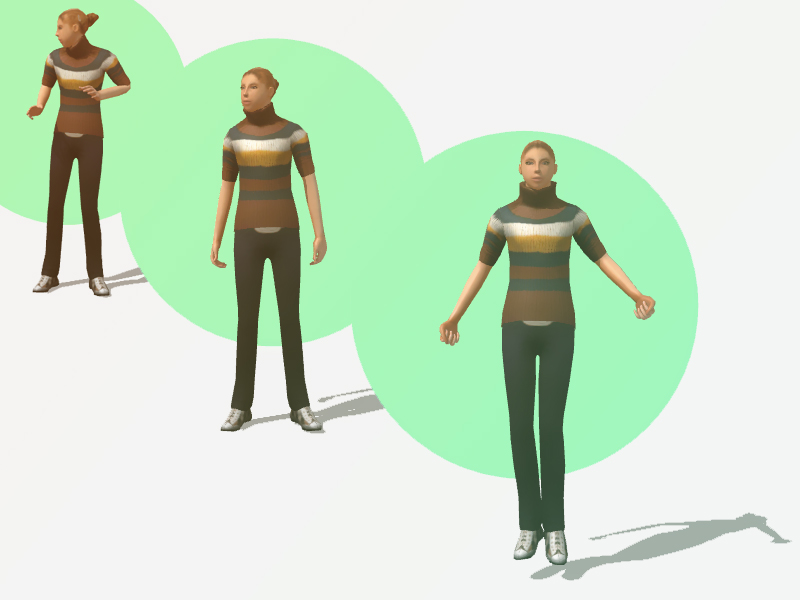
Ever had a personal website dedicated to your work and wondered if you should include a photo of yourself in there somewhereI recently figured I’d go a couple steps further and added a fully interactive 3D version of myself that watched the user’s cursor as they navigated around my screen. And ass if that wasn’t enough, you could even click on me and I’d do stuff. This tutorial shows you how to do the same with a model we chose named Stacy.
曾经有一个专门针对您的工作的个人网站,并且想知道您是否应该在其中放置自己的照片吗最近,我想我可以再走几步,并添加了一个完全交互式的3D版本的自己,当用户在我的屏幕上浏览时,它会看着用户的光标。 而且这还不够,你甚至可以点击我,我会做的。 本教程向您展示如何对我们选择的名为Stacy的模型执行相同的操作。
Here’s the demo (click on Stacy, and move your mouse around the Pen to watch her follow it).
这是演示(单击Stacy,然后在Pen上移动鼠标以观看她的操作)。
We’re going to use Three.js, and I’m going to assume you have a handle on JavaScript.
我们将使用Three.js,并且假设您对JavaScript有所了解。
See the Pen Character Tutorial – Final by Kyle Wetton (@kylewetton) on CodePen.
请参阅CodePen上的Kyle Wetton( @kylewetton )的笔字符教程-最终版本。
The model we use has ten animations loaded into it, at the bottom of this tutorial, I’ll explain how its set up. This is done in Blender and the animations are from Adobe’s free animation repo, Mixamo.
我们使用的模型已加载了十个动画,在本教程的底部,我将说明其设置方法。 这是在Blender中完成的,动画来自Adobe的免费动画仓库Mixamo 。
第1部分:HTML和CSS项目入门 (Part 1: HTML and CSS Project Starter)
Let’s get the small amount of HTML and CSS out of the way. This pen has everything you need. Follow along by forking this pen, or copy the HTML and CSS from here into a blank project elsewhere.
让我们排除少量HTML和CSS。 这支笔拥有您所需的一切。 跟随这支笔,或者将HTML和CSS从此处复制到其他地方的空白项目中。
See the Pen Character Tutorial – Blank by Kyle Wetton (@kylewetton) on CodePen.
见钢笔字教程-空白凯尔Wetton( @kylewetton )上CodePen 。
Our HTML consists of a loading animation (currently commented out until we need it), a wrapper div and our all-important canvas element. The canvas is what Three.js uses to render our scene, and the CSS sets this at 100% viewport size. We also load in two dependencies at the bottom of our HTML file: Three.js, and GLTFLoader (GLTF is the format that our 3D model is imported as). Both of these dependencies are available as npm modules.
我们HTML包含一个加载动画(当前被注释掉,直到需要使用它),一个包装div和我们所有重要的canvas元素。 画布是Three.js用于渲染场景的工具,CSS将其设置为100%视口大小。 我们还在HTML文件的底部加载了两个依赖项:Three.js和GLTFLoader(GLTF是导入3D模型的格式)。 这两个依赖项都可以作为npm模块使用。
The CSS also consists of a small amount of centering styling and the rest is just the loading animation; really nothing more to it than that. You can now collapse your HTML and CSS panels, we will delve into that very little for the rest of the tutorial.
CSS还包含少量居中样式,其余只是加载动画。 真的,仅此而已。 现在,您可以折叠HTML和CSS面板,在本教程的其余部分中,我们将对此进行深入研究。
第2部分:构建场景 (Part 2: Building our Scene)
In my last tutorial, I found myself making you run up and down your file adding variables at the top that needed to be shared in a few different places. This time I’m going to give all of these to you upfront, and I’ll let you know when we use them. I’ve included explanations of what each are if you’re curious. So, our project starts like this. In your JavaScript add these variables. Note that because there is a bit at work here that would otherwise be in global scope, we’re wrapping our entire project in a function:
在上一教程中,我发现自己让您在文件中上下运行,并在顶部添加了需要在几个不同位置共享的变量。 这次,我将把所有这些预先提供给您,当我们使用它们时,我会通知您。 如果您有好奇心,我已经提供了每个解释。 因此,我们的项目就是这样开始的。 在您JavaScript中添加这些变量。 请注意,因为这里有些工作本来应该在全局范围内进行,所以我们将整个项目包装在一个函数中:
We’re going to set up Three.js. This consists of a scene, a renderer, a camera, lights, and an update function. The update function runs on every frame.
我们将设置Three.js。 它由一个场景,一个渲染器,一个照相机,灯光和一个更新功能组成。 更新功能在每一帧上运行。
Let’s do all this inside an init() function. Under our variables, and inside our function scope, we add our init function:
让我们在init()函数中完成所有这些操作。 在变量下,在函数范围内,我们添加init函数:
Inside our init function, let’s reference our canvas element and set our background color, I’ve gone for a very light grey for this tutorial. Note that Three.js doesn’t reference colors in a string like so “#f1f1f1”, but rather a hexadecimal integer like 0xf1f1f1.
在我们的init函数中,让我们引用我们的canvas元素并设置我们的背景色,在本教程中,我已经选择了非常浅的灰色。 请注意,Three.js不会像“#f1f1f1”这样的字符串中引用颜色,而是像0xf1f1f1这样的十六进制整数。
Below that, let’s create a new Scene. Here we set the background color, and we’re also going to add some fog. This isn’t that visible in this tutorial, but if your floor and background color are different, it can come in handy to blur those together.
在此之下,让我们创建一个新场景。 在这里,我们设置背景色,并且还将添加一些雾。 这在本教程中并不明显,但是如果您的背景色和背景色不同,则可以方便地将它们模糊在一起。
Next up is the renderer, we create a new renderer and pass an object with the canvas reference and other options. The only option we’re using here is that we’re enabling antialiasing. We enable shadowMap so that our character can cast a shadow, and we set the pixel ratio to be that of the device, this is so that mobile devices render correctly. The canvas will display pixelated on high density screens otherwise. Finally, we add our renderer to our document body.
接下来是渲染器,我们创建一个新的渲染器,并通过画布引用和其他选项传递一个对象。 我们在这里使用的唯一选项是启用抗锯齿。 我们启用shadowMap,以便我们的角色可以投射阴影,并将像素比设置为设备的像素比,这样移动设备才能正确渲染。 否则,画布将在高密度屏幕上显示像素化。 最后,我们将渲染器添加到文档主体中。
That covers the first two things that Three.js needs. Next up is a camera. Let’s create a new perspective camera. We’re setting the field of view to 50, the size to that of the window, and the near and far clipping planes are the default. After that, we’re positioning the camera to be 30 units back, and 3 units down. This will become more obvious later. All of this can be experimented with, but I recommend using these settings for now.
这涵盖了Three.js需要的前两件事。 接下来是相机。 让我们创建一个新的透视相机。 我们将视场设置为50,将窗口的大小设置为窗口的大小,默认设置为近和远剪切平面。 之后,我们将摄像机定位在向后30个单位和向后3个单位的位置。 这将在以后变得更加明显。 可以尝试所有这些设置,但是我建议暂时使用这些设置。
Note that scene, renderer and camera are initially referenced at the top of our project.
请注意,场景,渲染器和摄影机最初是在我们项目的顶部引用的。
Without lights our camera has nothing to display. We’re going to create two lights, a hemisphere light, and a directional light. We then add them to the scene using scene.add(light).
没有灯光,我们的相机将无法显示。 我们将创建两个光源,一个半球光源和一个定向光源。 然后,我们使用scene.add( light )将它们添加到场景中。
Let’s add our lights under the camera. I’ll explain a bit more about what we’re doing afterwards:
让我们在相机下添加灯光。 我将进一步解释我们之后的工作:
The hemisphere light is just casting white light, and its intensity is at 0.61. We also set its position 50 units above our center point; feel free to experiment with this later.
半球光只是投射白光,其强度为0.61。 我们还将其位置设置为比中心点高50个单位。 请稍后再尝试。
Our directional light needs a position set; the one I’ve chosen feels right, so let’s start with that. We enable the ability to cast a shadow, and set the shadow resolution. The rest of the shadows relate to the lights view of the world, this gets a bit vague to me, but its enough to know that the variable d can be adjusted until your shadows aren’t clipping in strange places.
我们的定向灯需要定位。 我选择的那种感觉不错,所以让我们开始吧。 我们启用了投射阴影并设置阴影分辨率的功能。 阴影的其余部分与世界的灯光视图有关,这对我来说有点模糊,但足以知道可以调整变量d,直到您的阴影不会在陌生的地方修剪为止。
While we’re here in our init function, lets add our floor:
当我们在这里使用init函数时,让我们添加地板:
来源:culiao9310
声明:本站部分文章及图片转载于互联网,内容版权归原作者所有,如本站任何资料有侵权请您尽早请联系jinwei@zod.com.cn进行处理,非常感谢!