如果您要向Django应用程序添加基本??身份验证,本教程非常适用!本文从头开始构建应用程序,并使用Django身份验证系统通过用户名和密码对用户进行身份验证。
入门:配置开发环境
本教程中,我们使用安装了CodeMix插件的Eclipse IDE。除此之外,还需要在系统中安装Python。
配置
首先,在Eclipse中创建一个虚拟项目,并使用其终端执行几个命令来创建项目。


在本教程中,将使用Pipenv。可以在终端中使用以下命令来安装它:
pip install pipenv

激活Pipenv shell继续进行Django项目创建。在打开的Terminal +中,执行以下命令:
pipenv shell
然后安装Django软件包并创建一个新项目:
pipenv install djangodjango-admin startproject DjangoAuth
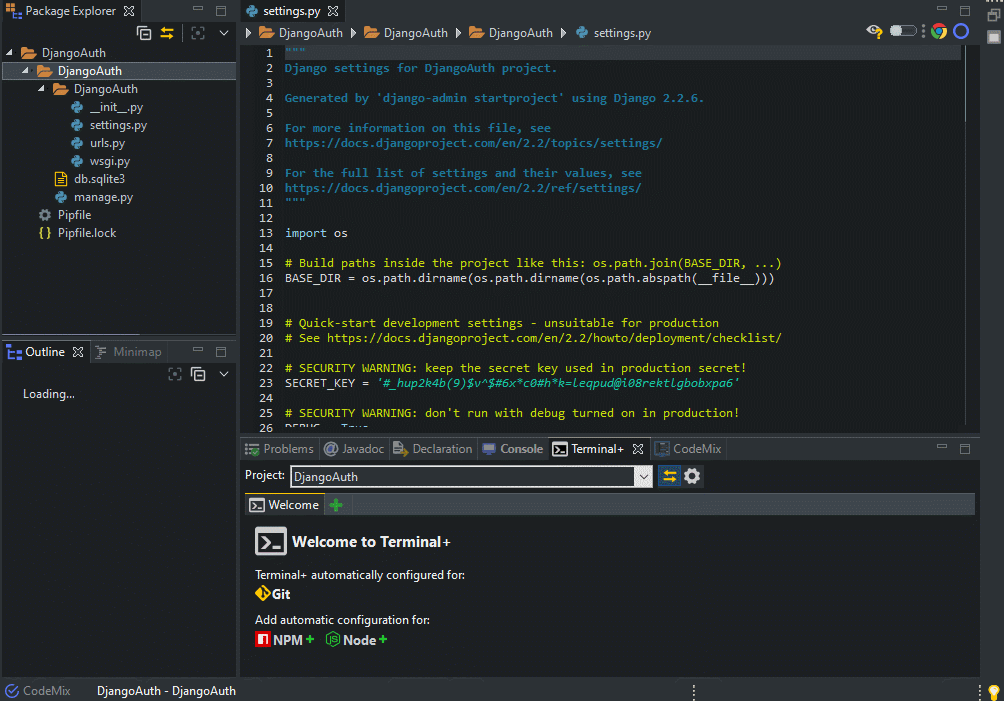
命令django-admin startproject DjangoAuth将生成一堆文件以及包含django.contrib的模块(具备身份验证支持)。下面是新创建的Django项目的结构:

默认情况下,所需的配置包含在中settings.py。
# settings.pyINSTALLED_APPS = [ 'django.contrib.admin', 'django.contrib.auth', # core of the authentication 'django.contrib.contenttypes', 'django.contrib.sessions', 'django.contrib.messages', 'django.contrib.staticfiles',]
现在,在pipenv shell上运行以下命令来创建服务器并运行它:
./manage.py migrate./manage.py runserver

如上所示,开发服务器将在http://127.0.0.1:8000/上进行监听。
构建应用
django.contrib.auth提供向应用程序添加身份验证所需的全部信息。下面,让我们一起来看看默认情况下这个模块提供了什么。
将模块的url包含在djangoauth/ URLs .py中:
from django.contrib import adminfrom django.urls import path, includeurlpatterns = [ path('admin/', admin.site.urls), path('auth/', include('django.contrib.auth.urls')),]
创建身份验证模板。模板基本包含所需HTML输出的静态部分,以及将插入的动态内容的某些特殊语法。我们将通过在模板目录中创建替换模板来研究覆盖身份验证模板。
TEMPLATES = [ { 'BACKEND': 'django.template.backends.django.DjangoTemplates', 'DIRS':[os.path.join(BASE_DIR, 'Templates')], 'APP_DIRS': True, 'OPTIONS': { 'context_processors': [ 'django.template.context_processors.debug', 'django.template.context_processors.request', 'django.contrib.auth.context_processors.auth', 'django.contrib.messages.context_processors.messages', ], }, },]WSGI_APPLICATION = 'djangoauth.wsgi.application'
这些设置假定我们在项目的根目录中有一个模板目录。
Django模板利用了全局上下文处理器,该处理器基本上允许我们在模板之间使用数据,在这种情况下,我们定义的变量django.contrib.auth.context_processors.auth将借用经过身份验证的实际用户作为值,或者在没有用户登录的情况下,使用AnonymouseUser实例。
接下来,创建Templates目录,并创建一个Registration目录,并在其中创建一个login.html文件,如下所示:
因为需要显示没有任何CSS样式的默认表单,所以我们将使用Bootstrap。同样的,base.html在模板中创建一个文件并添加如下内容:
<!doctype html><html> <head> <!-- Required meta tags --> <meta charset="utf-8"> <meta name="viewport" content="width=device-width, initial-scale=1, shrink-to-fit=no"> <!-- Bootstrap CSS --> <link rel="stylesheet" href="https://stackpath.bootstrapcdn.com/bootstrap/4.3.1/css/bootstrap.min.css" integrity="sha384-ggOyR0iXCbMQv3Xipma34MD+dH/1fQ784/j6cY/iJTQUOhcWr7x9JvoRxT2MZw1T" crossorigin="anonymous"> <title>Diary</title> <style> html { font-size: 14px; } label { font-weight: 700; display: block; } textarea:focus, input:focus{ outline: none; border: none; } *:focus { outline: none; } .form-control:focus { border-color: inherit; -webkit-box-shadow: none; box-shadow: none; } .form-group { border-bottom-width: 1px; border-color: #e9ecef; padding-top: 1rem; padding-bottom: .5rem; color: #22292f; border-bottom: 1px solid #e9ecef; } .form-control { border: none; transition: background-color 5000s ease-in-out 0s; margin-top: .75rem; font-size: 100%; line-height: 1.15; margin-left: -10px; } .remove-form-group-border { border-bottom: 1px solid white; } body { background: #f7f6f4; } a { text-decoration: none; } .brand { text-decoration: none; } .brand > span { color: #633dff; font-size: 25px; } .btn { background: #633dff; color: white; border-color: #633dff } .btn:hover { color: white; } </style> </head> <body> {% block content %} {% endblock %} <!-- Optional JavaScript --> <!-- jQuery first, then Popper.js, then Bootstrap JS --> <script src="https://code.jquery.com/jquery-3.3.1.slim.min.js" integrity="sha384-q8i/X+965DzO0rT7abK41JStQIAqVgRVzpbzo5smXKp4YfRvH+8abtTE1Pi6jizo" crossorigin="anonymous"></script> <script src="https://cdnjs.cloudflare.com/ajax/libs/popper.js/1.14.7/umd/popper.min.js" integrity="sha384-UO2eT0CpHqdSJQ6hJty5KVphtPhzWj9WO1clHTMGa3JDZwrnQq4sF86dIHNDz0W1" crossorigin="anonymous"></script> <script src="https://stackpath.bootstrapcdn.com/bootstrap/4.3.1/js/bootstrap.min.js" integrity="sha384-JjSmVgyd0p3pXB1rRibZUAYoIIy6OrQ6VrjIEaFf/nJGzIxFDsf4x0xIM+B07jRM" crossorigin="anonymous"></script> </body></html>
现在,添加login.html的内容:
{% extends "base.html" %}{% block content %}<div class="container pt-5"> <div class="row justify-content-center"> <div class="col-lg-6 col-md-6 col-sm-8"> <h4 class="pt-2"><a href="#" class="brand"><span>CodeMix Django Tutorial</span></a>Log In</h4> <br> {% if form.errors %} <div class="alert alert-danger alert-dismissible fade show" role="alert"> <strong>Your username and password didn't match. Please try again.</strong> <button type="button" class="close" data-dismiss="alert" aria-label="Close"> <span aria-hidden="true">×</span> </button> </div> {% endif %} <form method="POST" action="{% url 'login' %}" class="form"> {% csrf_token %} <div class="form-group"> <label for="password">Username</label> <input name="username" type="text" class="form-control" id="id_username" placeholder="username" style="background: #f7f6f4"> </div> <div class="form-group"> <label for="password">Password</label> <input name="password" type="password" class="form-control" id="id_password" placeholder="******" style="background: #f7f6f4"> </div> <div class="form-group form-check remove-form-group-border"> <input type="checkbox" class="form-check-input" id="remember" name="remember" style="padding-top: -5px"> <label for="remember" class="form-check-label" style="margin-top: -5px">Remember Me</label> <p class="float-right" style="margin-top: -25px"> <a href="{% url 'password_reset' %}" class="no-underline text-primary">Forgot your passwordlt;/a> </p> </div> <input type="hidden" name="next" value="{{ next }}"> <button type="submit" class="btn btn-lg">Login</button> <p class="float-right" style="margin-top: 0px"> </p> </form> </div> </div></div>{% endblock %}
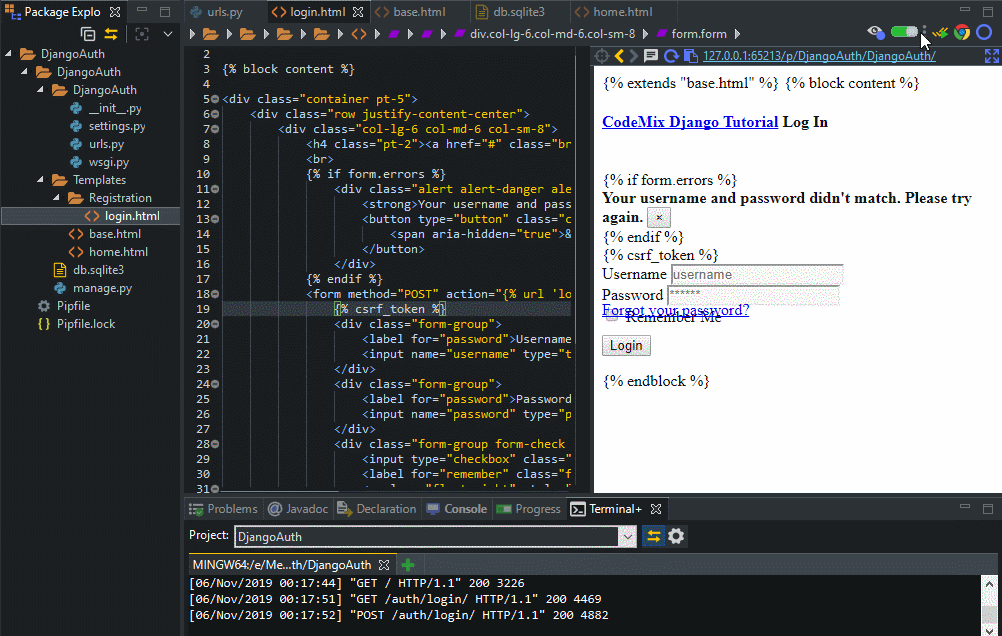
设置完所有内容后,可以使用Live Preview查看应用程序的外观。实现这一操作,只需要指定的URL运行应用程序,通过点击Live Preview中显示的URL和插入http://localhost:8000/auth/login/作为项目的默认URL。
现在应该看到一个类似于下面的登录屏幕:
创建用户
现在,需要通过使用CTRL + C终止服务器来创建新用户。在打开的Terminal +中执行以下命令并输入所需的登录详细信息,包括用户、电子邮件(可以省略)和密码:
./manage.py createsuperuser
为应用创建超级用户后,记住可以使用默认的Django管理工具管理用户库,可以通过http://127.0.0.1:8000/admin/进行访问。在这里,可以创建、消除或只是查看用户及其在网站上的特权。

现在,再次运行服务器并输入凭据,我们将被重定向到配置文件页面http://127.0.0.1:8000/accounts/profile/,该页面无没有任何要返回的内容。我们需要将用户重定向到实际的页面。
在DjangoAuth/settings.py文件中添加登录重定向URL和注销URL,如下所示:
LOGIN_REDIRECT_URL = '/'LOGOUT_REDIRECT_URL = '/'
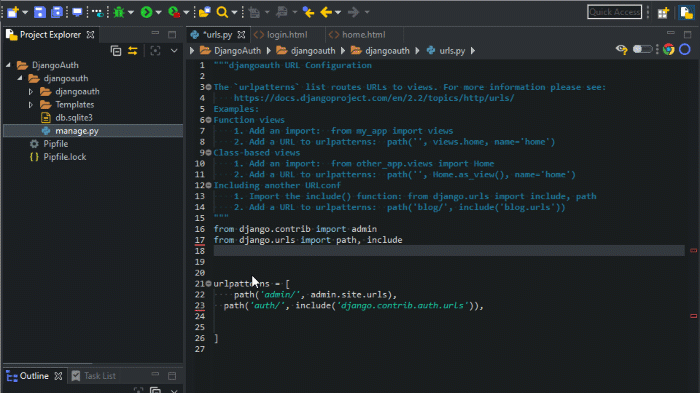
在DjangoAuth/urls.py文件中导入模板视图,该文件应如下所示:
from django.contrib import adminfrom django.urls import path, includefrom django.views.generic.base import TemplateViewurlpatterns = [ path('admin/', admin.site.urls), path('auth/', include('django.contrib.auth.urls')), path('', TemplateView.as_view(template_name='home.html'), name='home'),]
创建一个名为.template/home.html的新文件。
{% extends "base.html" %}{% block content %}<div class="text-black mt-10 mb-20"> <div class="container mx-auto"> <div class="flex justify-center flex-wrap"> <div class="w-full lg:w-2/3 px-5"> <h1 class="mb-5 text-center">CodeMix Tutorial</h1> <h2 class="text-center mb-5">Develop Angular, React, Python and Vue app with ease</h2> <p class="text-center"> {% if user.is_authenticated %} <strong>{{ user.username }}</strong>, focus on developing with CodeMix <a href="{% url 'logout' %}" class="btn btn-danger mt-5" style="background: red; border: 1px solid red">Logout here</a> {% else %} <a href="{% url 'login' %}" class="btn btn-primary">Login</a> {% endif %} </p> </div> </div> </div></div>{% endblock %}
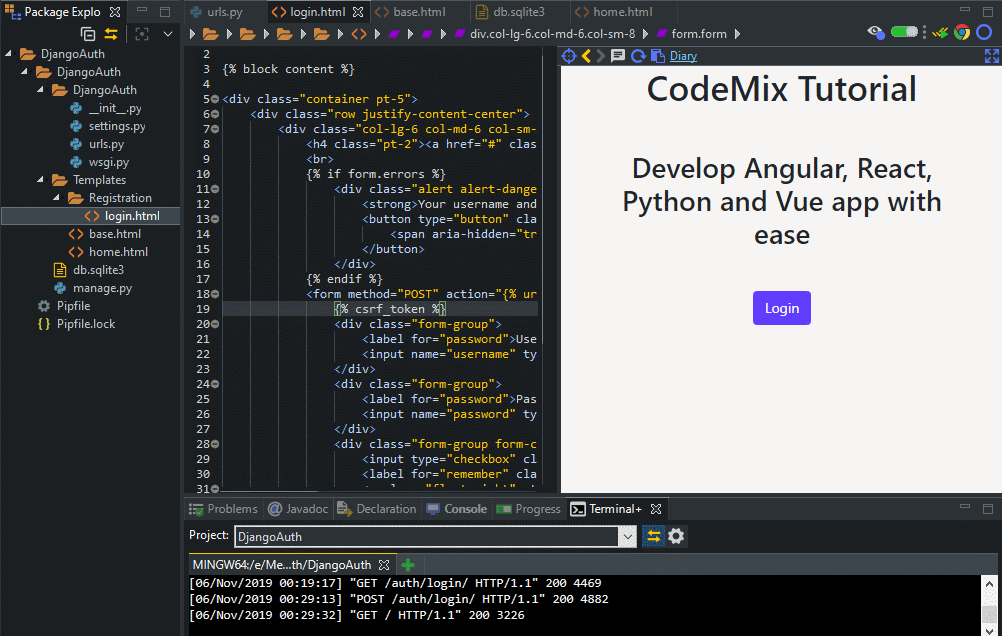
做到这里,就已经完成了在Django应用程序中添加基本身份验证。最终的结果应该是这样的:
16周年·技术服务月,软件商城优惠券不限量免费领取,购CodeMix享折上折优惠>>>
更多产品资源、活动详情,请咨询【客服】了解

标签:
来源:慧都
声明:本站部分文章及图片转载于互联网,内容版权归原作者所有,如本站任何资料有侵权请您尽早请联系jinwei@zod.com.cn进行处理,非常感谢!