本文主要介绍如何使用Kendo UI for Angular组件的图表功能,欢迎下载最新版产品体验!
本文提供了开始使用
完成本指南后,您将能够获得如下示例所示的最终结果。
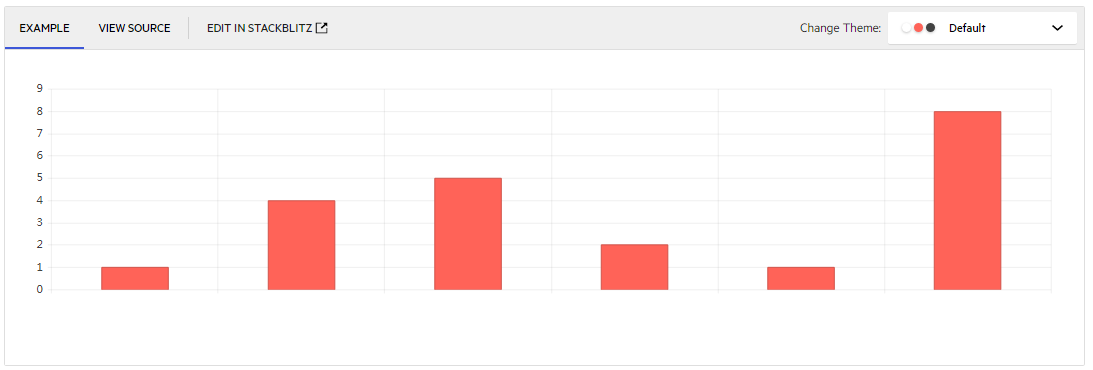

import { Component } from '@angular/core';@Component({selector: 'my-app',template: `<kendo-chart style="height:250px"><kendo-chart-series><kendo-chart-series-item [data]="[1, 4, 5, 2, 1, 8]"> </kendo-chart-series-item></kendo-chart-series></kendo-chart>`})export class AppComponent {}
设置您的 Angular 项目
在开始安装任何Kendo UI for Angular控件之前,请确保您有一个正在运行的Angular项目。无论您要使用什么Kendo UI for Angular包,完成组件安装的先决条件是相同的。
安装组件
您可以选择使用以下两种方法当中的一种来安装Kendo UI for Angular包和您要应用的样式:
- 使用 Angular CLI 快速设置
- 手动设置
使用 Angular CLI 快速设置
快速设置提供了一种通过 ng-add 命令使用 Angular CLI 添加包的自动方法,它适用于节省时间和精力,因为 ng-add 在单个步骤中执行一组其他单独需要的命令。
要为Angular Charts包添加Kendo UI,请运行以下命令:
ng add @progress/kendo-angular-charts
因此,ng-add 命令将执行以下操作:
- 将 @progress/kendo-angular-charts 包添加为 package.json 文件的依赖项。
- 在当前应用程序模块中导入 ChartsModule。
- 在 angular.json 文件中注册 Kendo UI 默认主题。
- 将所有必需的对等依赖项添加到 package.json 文件中。
- 触发 npm install 安装主题和所有添加的对等包。
手动设置
手动设置提供了对安装在 Angular 应用程序中的文件和引用的更高可见性和更好的控制,您可以通过为每个步骤运行单独的命令并在应用程序根或功能模块中导入所需的组件模块来安装所需的对等依赖项和 Kendo UI 主题。
1. 通过运行以下命令安装 Charts 包及其依赖项:
npm install –save @progress/kendo-angular-charts @progress/kendo-angular-common @progress/kendo-angular-intl @progress/kendo-angular-l10n @progress/kendo-angular-popup @progress/kendo-drawing hammerjs @progress/kendo-licensing
2. 如果您的应用程序中需要所有 Charts 组件,请使用 ChartsModule 一次导入所有 Charts。否则,通过添加单独的模块来导入特定的组件。
Charts 包为其组件导出以下各个模块:

- 要添加所有 Charts 组件,请在您的根应用程序或功能模块中导入 ChartsModule。
import { NgModule } from '@angular/core';import { BrowserModule } from '@angular/platform-browser';import { BrowserAnimationsModule } from '@angular/platform-browser/animations';import { ChartsModule } from '@progress/kendo-angular-charts';import { AppComponent } from './app.component';import 'hammerjs';@NgModule({bootstrap: [AppComponent],declarations: [AppComponent],imports: [BrowserModule, BrowserAnimationsModule, ChartsModule]})export class AppModule {}
- 要添加单独的 Charts 组件,只需在根应用程序或功能模块中导入您需要的模块。
import { NgModule } from '@angular/core';import { BrowserModule } from '@angular/platform-browser';import { BrowserAnimationsModule } from '@angular/platform-browser/animations';// Imports the Chart moduleimport { ChartModule } from '@progress/kendo-angular-charts';// Imports the Sparkline moduleimport { SparklineModule } from '@progress/kendo-angular-charts';@NgModule({bootstrap: [AppComponent],imports: [BrowserModule, BrowserAnimationsModule,ChartModule, SparklineModule]})export class AppModule {}
3. 下一步是通过安装可用的 Kendo UI 主题(Kendo UI Default、Kendo UI Material 或 Kendo UI Bootstrap)来设置组件的样式。
3.1 要开始使用主题,请通过 NPM 安装其包。
默认主题
npm install –save @progress/kendo-theme-default
Bootstrap主题
npm install –save @progress/kendo-theme-bootstrap
Material主题
npm install –save @progress/kendo-theme-material
3.2 安装主题包后,在您的项目中引用它,您可以通过以下方式在项目中包含 Kendo UI 主题:
- 通过使用external (CDN) link
- 通过使用 precompiled CSS file
- 通过从 SCSS source files编译主题
使用组件
1. 成功安装Charts包并导入需要的模块后,在app.component.html中添加您需要的组件对应的标签。 比如需要Chart组件,添加如下代码:
<kendo-chart><kendo-chart-series><kendo-chart-series-item [data]="[1, 4, 5, 2, 1, 8]"> </kendo-chart-series-item></kendo-chart-series></kendo-chart>
2. 通过在根文件夹中运行以下命令来构建和提供应用程序。
ng serve
3. 将浏览器指向 http://localhost:4200来查看页面上Kendo UI for Angular Chart 组件。
激活您的授权许可密钥
截至 2020 年 12 月,使用Kendo UI for Angular库中的任何 UI 组件都需要商业授权许可证密钥或有效的试用许可证密钥。 如果您的应用程序不包含Kendo UI授权许可证文件,请激活您的许可证密钥。
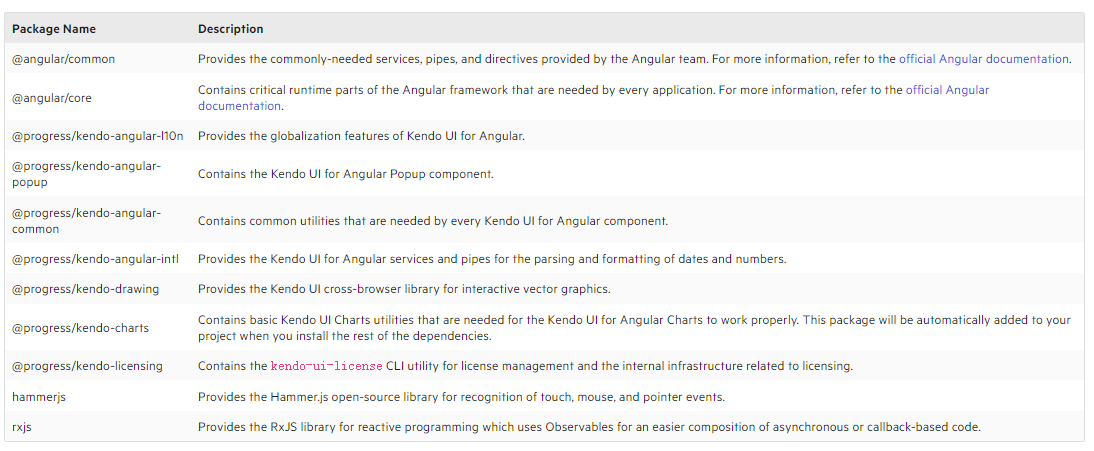
依赖关系
下表列出了每个 Charts 依赖项根据包提供的特定功能:
Kendo UI for Angular | 下载试用
Kendo UI for Angular是Kendo UI系列商业产品的最新产品。Kendo UI for Angular是专用于Angular开发的专业级Angular组件。telerik致力于提供纯粹的高性能Angular UI组件,无需任何jQuery依赖关系。
了解最新Kendo UI最新资讯,请关注Telerik中文网!

标签:
来源:慧都
声明:本站部分文章及图片转载于互联网,内容版权归原作者所有,如本站任何资料有侵权请您尽早请联系jinwei@zod.com.cn进行处理,非常感谢!